
Photo: Pexels
Matching Drywall Texture After a Repair in Killeen, TX
Getting drywall texture to match after a repair is the difference between a patch that disappears and one that catches the eye at every open house or inspection.
Quick Answer
Match Killeen home textures by identifying the pattern, practicing on scrap, and applying in thin layers for a seamless blend.
Tools needed
Spray texture (orange peel or knockdown style), Knockdown knife, Joint compound, Scrap drywall or cardboard for practice, Primer and paint, Fine sandpaper

Identify Your Existing Texture
The first step in matching texture is knowing what you are matching. Take a close look at the wall around the repair and compare it to these common patterns.
Orange peel is a uniform pattern of small bumps covering the entire surface, like the skin of an orange. This is the standard texture in most Killeen subdivision homes and military housing built in the last 15 to 20 years.
Knockdown is a two-step texture: splatter applied to the wall, then flattened with a wide knife. The result is irregular flat islands separated by narrow valleys. Common in Killeen homes from the late 1990s and early 2000s.
Skip trowel is a hand-applied texture with overlapping arcs and ridges. Less common in Killeen but found in some custom builds.
Smooth walls have no texture. Newer construction in the Harker Heights area and some Killeen subdivisions built after 2018 have moved toward smooth finishes, which are increasingly popular.
If you are in military housing or a rental preparing for a move-out inspection, your walls almost certainly have orange peel. Knowing this up front saves time and lets you buy the right products on the first trip to the store.
Step-by-Step: Matching Orange Peel Texture
Orange peel is the most common texture in Killeen and the most forgiving to match. Spray-can texture products are designed for this pattern.
Step 1: Prepare the patched area
The drywall patch underneath needs to be smooth, sanded, and dust-free. Run your fingers over the transition between patch and existing wall, if you feel a ridge or lip, sand it down. Texture amplifies surface imperfections rather than hiding them.
Step 2: Practice on cardboard or scrap drywall
This step is the difference between a patch that disappears and one that catches the eye. Grab a piece of cardboard and spray several test patches at different distances and nozzle settings. Hold the can 18 to 24 inches from the surface and use short bursts.
Let your practice patches dry before judging the match. Wet texture always looks heavier than it will once cured.
Step 3: Mask and apply
Tape off the area with painter's tape, leaving a few inches of existing texture exposed along the edges for blending. Spray in thin, even coats. Two light passes produce a more convincing texture than one heavy pass.
Step 4: Feather the edges
This is the critical step. As you approach the boundary between new and old texture, increase your spray distance and reduce the amount of texture. The transition must be gradual. A hard line between new and old texture is visible from across the room and will not pass any inspection.
Step 5: Let it cure
Wait at least 2 hours before priming. The texture needs to be fully dry and firm to the touch.
Step-by-Step: Matching Knockdown Texture
Knockdown adds a second operation, flattening the splatter with a knife, which makes the timing between steps critical.
Step 1: Prep and practice
Same surface prep as orange peel. For knockdown, your practice round is especially important because you need to dial in two things: the splatter pattern and the knockdown timing. Set up a large piece of cardboard and do the full process at least twice.
Step 2: Splatter the surface
Use a spray can at a large droplet setting or a hopper gun loaded with thinned joint compound. Cover the repair area and extend the splatter a couple of inches past the edges into the existing texture.
Step 3: Wait, then knock down
Let the splatter firm up for 10 to 15 minutes. The compound should be tacky but not wet. Drag a clean knockdown knife lightly across the surface in one direction. Light pressure, you are skimming the tops of the splatter, not pushing it around. Wipe your knife clean between passes.
If the compound smears instead of flattening, it is too wet. Wait a few more minutes. If it will not flatten at all, it has set up too much and you will need to scrape it off and start over.
Step 4: Blend the transition
Use the knockdown knife or a damp sponge to soften the edge where new meets old. The overlap zone is where the match either works or does not.
Killeen Texture Patterns and Housing Types
Killeen's housing stock has some specific patterns that help with texture matching.
Military housing and on-post quarters: Standard orange peel texture, machine-applied. Very uniform. This is the easiest to match because it is consistent and spray-can products replicate it well. If you are prepping for a move-out inspection, a clean orange peel match on your patches goes a long way toward a smooth checkout.
Killeen subdivisions (2000s to 2015): Most use orange peel or medium knockdown, applied by the builder's drywall subcontractor. The texture is consistent throughout the home and across the neighborhood, which makes matching straightforward.
Newer Harker Heights and south Killeen builds (2016 and newer): Smooth walls are becoming the norm in this area. If your home has smooth walls, you do not need texture, but you do need a flawless patch. Every imperfection shows on a smooth wall. Skim coat, sand to 150-grit, and inspect under a raking light.
Older Killeen homes (pre-2000): These may have heavier knockdown or popcorn-adjacent textures that are harder to match with modern products. If the texture on your walls is unusually heavy or does not match anything at the hardware store, that is a signal to consider calling a pro.
Move-Out Inspection Standards
For military families and renters in Killeen, texture matching often comes up during move-out prep. Inspection standards vary by landlord and property management company, but the general expectation is that patches should be clean, smooth, and textured to match the surrounding wall.
A visible patch, smooth spot on a textured wall, wrong texture pattern, or obvious edges, can result in a charge for professional repair. Taking the time to match the texture properly, including the practice step, usually costs less than $20 in supplies and avoids a deduction from your deposit or a charge against your move-out checklist.
Prime Before Painting
New texture absorbs paint at a different rate than the existing painted wall. Even a perfect texture match looks wrong without primer, the patch appears duller or has a different sheen than the surrounding area.
Apply one coat of PVA primer over the textured area. Let it dry. Then paint with two coats of matching color. For paint matching, check your lease paperwork for the color and brand, or pull a small chip from behind a light switch plate and take it to the store.
Know When to Call a Professional
Small wall patches with standard orange peel or knockdown are manageable if you practice first. But some jobs are genuinely hard, and being honest about that saves time and money:
- Ceilings. Overhead texture work is messy and difficult to control. Drips, uneven coverage, and neck strain make ceiling texture matching a job most people hand off.
- Large patches or multiple repairs. If you are patching five or six spots across a room, the cumulative blending challenge adds up. A pro can retexture efficiently with commercial equipment.
- Heavy or unusual textures. If your home has a thick, unique texture pattern that does not match anything at the hardware store, a pro with a hopper gun and experience can replicate it.
- Pre-sale or inspection-critical repairs. When the patch absolutely has to be invisible, for a home sale or a strict inspection, the cost of a professional repair is usually worth the peace of mind.
PatchMaster handles drywall texture work across the Waco-Temple-Killeen area. Their profile and coverage details are at PatchMaster Waco-Temple.
Related Guides
- How Much Does Drywall Repair Cost in Killeen?, what professional texture work costs
- How to Patch Small Drywall Holes in Killeen, the patching step that comes before texture matching
- Signs Your Drywall Needs Repair in Killeen, know what to look for
- Drywall Texture Matching in Waco and Temple, same techniques, different local details
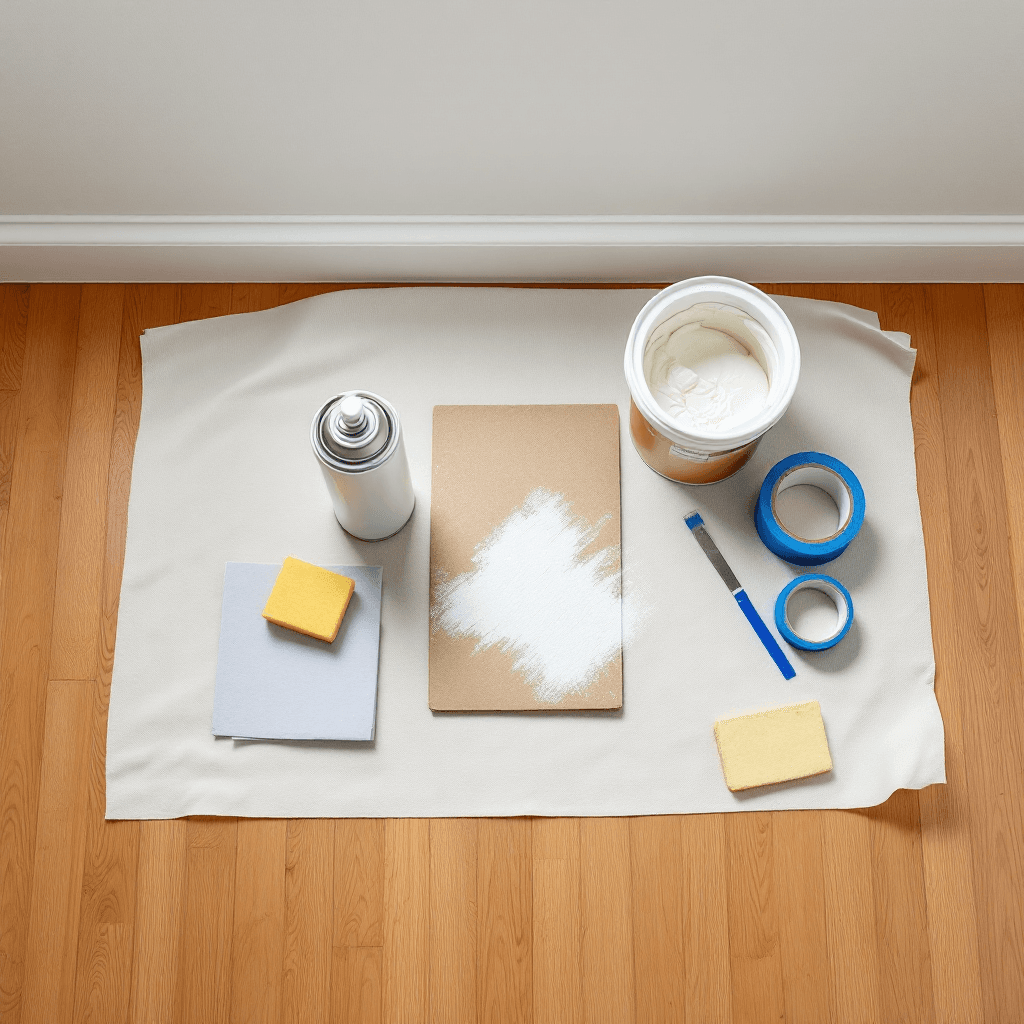
Photo: Pexels
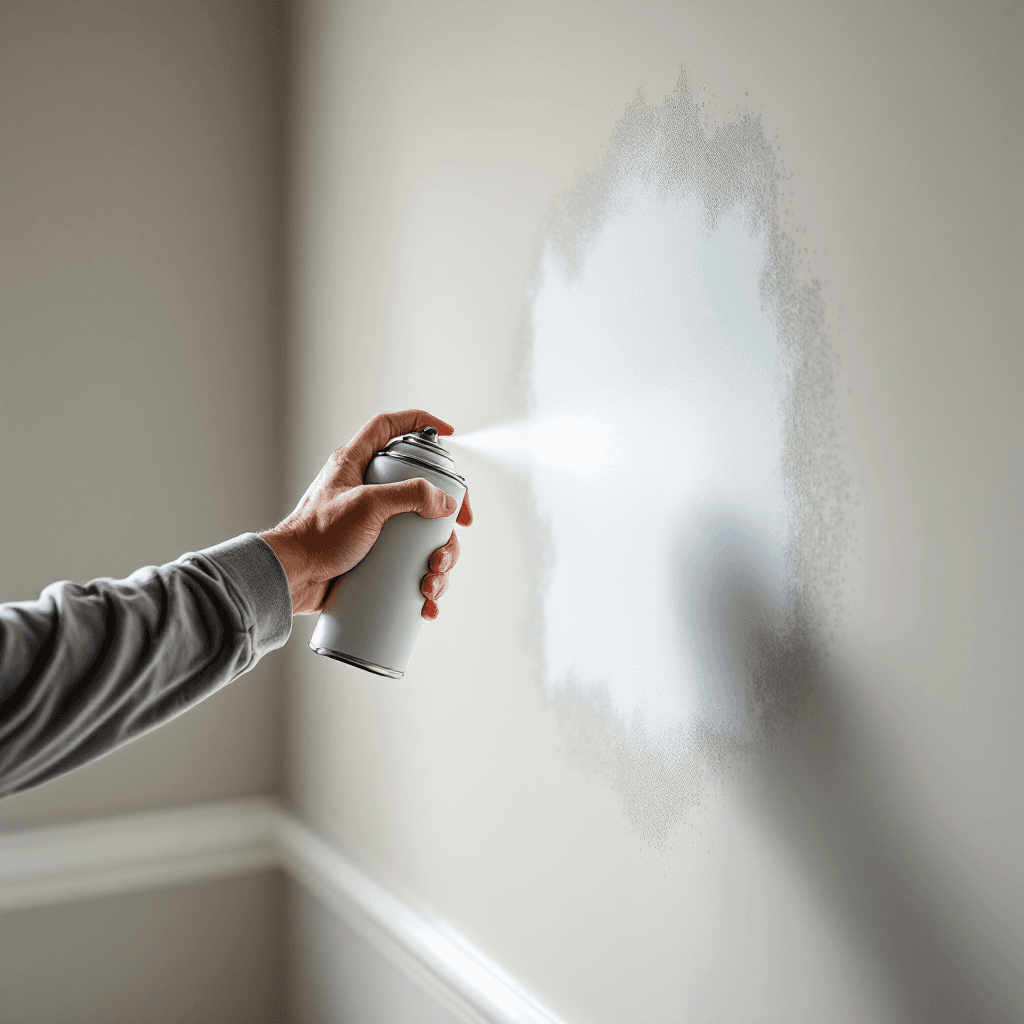
Photo: Pexels
Frequently Asked Questions
How do I match orange peel texture on drywall?▾
Can I use spray texture to match knockdown?▾
Why does my drywall patch look different after painting?▾
Will a bad texture match fail a move-out inspection?▾
What texture do most Killeen homes have?▾
How long should I wait before painting over new texture?▾
Related Guides
Water-Damaged Drywall in Waco: Repair or Replace?
Water-damaged drywall in Waco often needs professional assessment due to mold risk from Brazos River humidity and aging plumbing in older homes.
Water-Damaged Drywall in Killeen: Repair or Replace?
Most water-damaged drywall in Killeen homes needs professional assessment because mold risk is high, especially in homes that were vacant during deployments.
Matching Drywall Texture After a Repair in Waco, TX
Matching drywall texture after a repair is the trickiest part of making a patch disappear. This guide covers the common textures in Waco homes and how to replicate them.